⭐Must-Have Products I Use & Recommend!⭐
Personal Note
I personally use and love these products in my kitchen. I only recommend what I trust!
I personally use and love these products in my kitchen. I only recommend what I trust!
Disclosure: This post contains affiliate links. If you click and make a purchase, I may earn a small commission at no extra cost to you.
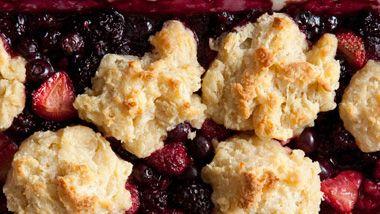
These delightful lingonberry tartlets are a taste of Nordic charm. The sweet and tart lingonberries perfectly complement the buttery, flaky crust, creating a harmonious balance of flavors and textures. Imagine sinking your teeth into one of these little gems – a burst of tartness followed by a satisfyingly sweet finish. This recipe is perfect for tea parties, holiday gatherings, or simply a delightful treat to enjoy on a quiet afternoon.
Making these tartlets may seem daunting at first, but trust me, they're easier than you think. This recipe breaks down the process step by step, providing you with clear instructions and helpful tips along the way. Whether you're a seasoned baker or a novice in the kitchen, you'll be able to create these beautiful and delicious tartlets with confidence. The result? Impressively delicious, melt-in-your-mouth tartlets that will impress you and your loved ones.
Required Equipments
- 9-inch tartlet pans
- Mixing bowls
- Whisk
- Measuring cups and spoons
- Rubber spatula
- Pastry blender or food processor
- Baking sheet
- Cooling rack
Lingonberry Tartlets: A Nordic Delight: Frequently Asked Questions
Lingonberry Tartlets: A Nordic Delight
These irresistible lingonberry tartlets offer a delightful blend of sweet and tart flavors, encased in a buttery, flaky crust. Perfect for any occasion!
⏳ Yield & Time
Yield: 12 servings
Preparation Time: 30 minutes
Cook Time: 30 minutes
Total Time:
🍽 Ingredients
📖 Instructions
- Preheat your oven to 350°F (175°C). Grease your 9-inch tartlet pans. If you're using non-stick pans, lightly flouring them is good practice..
- In a large bowl, whisk together 1 ½ cups of all-purpose flour, ½ cup of powdered sugar, and ¼ teaspoon of salt. Make sure it's all nice and evenly distributed.
- Cut in ½ cup (1 stick) of cold unsalted butter using a pastry blender or your fingers until the mixture resembles coarse crumbs. If you're using a food processor, pulse until it resembles coarse crumbs. I usually hum a little tune while doing this. It helps me focus.
- In a separate small bowl, whisk together 1 large egg yolk, 1 tablespoon of cold milk, and 1 teaspoon of vanilla extract. I like to use good quality vanilla; it really makes a difference. Ahem. I may or may not have a small vanilla obsession...
- Gradually add the wet ingredients to the dry ingredients, mixing with a rubber spatula until the dough just comes together. Don't overmix; just combine everything nicely.
- Turn the dough out onto a lightly floured surface and gently knead it 2-3 times just to bring it together. Avoid overkneading, as this can make the crust tough.
- Divide the dough into 12 equal pieces. Roll each piece into a small ball, then flatten it slightly with your fingers to fit into your tartlet pan.
- Press the dough evenly into each tartlet pan, ensuring that it covers the base and sides. Trim away any excess dough. Make sure the dough completely fills the tartlet pan; otherwise you'll have filling spilling out!
- Prick the bottom of each tart shell several times with a fork to prevent air bubbles from forming. This is a really important step; it stops the pastry from puffing up during baking.
- Bake for 12-15 minutes, or until the tart shells are lightly golden brown and set. Remove from the oven and let cool completely on a wire rack. It's okay if they're not perfectly golden brown. We're going for 'rustic chic' here, not perfection!
- Meanwhile, gently combine 1 ½ cups fresh or frozen lingonberries with ¼ cup of sugar and 1 tablespoon of cornstarch in a medium bowl. I usually add a pinch more sugar depending on how tart the berries are. Taste testing is absolutely required, of course!
- Once the tart shells are completely cool, carefully fill each shell with the lingonberry filling. Try to fill them evenly to ensure uniform cooking. Be gentle; we don't want to break the tart shells now!
- Bake for another 15-20 minutes, or until the filling is bubbly and slightly thickened. Let cool completely on a wire rack. I usually do a little happy dance when my baking is done. It’s just what I do!
- Once the tartlets have completely cooled, gently remove them from the tartlet pans. If they’re sticking a bit, use a thin knife to carefully loosen them. Don’t stress too much if they’re a little wonky. That's part of their charm!
- Garnish with a few fresh lingonberries, if desired, and serve. Enjoy your delightful Nordic tartlets!
📝 Notes
- For best results, use high-quality ingredients. Fresh lingonberries are ideal, but frozen ones will also work.
- If your tart shells start browning too quickly, cover them loosely with aluminum foil during the baking process.
- Don't overbake the tartlets; they should be golden brown but not overly hard.
- Allow the tartlets to cool completely before removing them from the pans to prevent them from breaking.
🍎 Nutrition
Calories: 250 kcal
Protein: 3 g
Fat: 12 g
Carbohydrates: 30 g
Fiber: 2 g
Calcium: 25 mg


